 |
Links for K-12 Teachers | Assessment Assistance | On-Line Practice Modules | Daily Dose of the Web
Word Processing
Microsoft Works 4.0
(Macintosh)
Creating a flyer
Step 1 - Launch Microsoft Works and select Word Processor

Step 2 - Go to the File menu, select Page Setup and choose Landscape orientation (the dark choice in the image below)

Step 3 - Go to the View menu, select Zoom and choose either 50% or 75%. The reason for that is so that you can see the entire page in your work area. On a screen set at 832 x 624, 75% is adequate. If your screen is set at 640 x 480, you may need to use 50% view.
Step 4 - Get out your rough draft of the flyer. I highly recommend that you not allow students to sit at one of your classroom computers without a rough draft. When we have a student to computer ratio of 1:1 or 2:1 you may be able to relax that rule. Composing at the computer will, in most instances, cause the project to intrude on class time that should be used for other activities. With that in mind, I recommend that you set an example for your student. Now, where is that rough draft?
Step 5 - Choose a font size that will be large enough to see in the reduced view you are using. Enter all of the text with no attempt at formatting. This will go smoother if you format after all the information is on the flyer. Leave at least two lines of empty space at the top and bottom of the flyer. You do not want the border to cover your text.
- Avoid the use of all caps. That format is harder to read. Your purpose in creating a flyer is to communicate information. Don't use a style that will get in the way of that purpose.
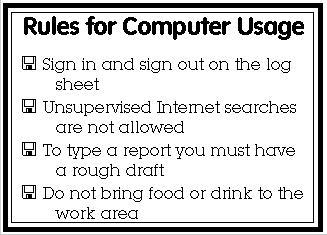
- If you do not have a rough draft, please use the text below as the subject of your flyer

Step 6 - Add one line of space between the headline and the first rule. Highlight the headline, center it, make it larger, and choose an interesting looking font.
Step 7 - Highlight the remaining lines of text and make them larger. Do not use a font that is too fancy. Use most of the space available to you, but keep this text smaller than the headline. My headline was 48 point. I decided that 24 point was not large enough, but no other choices were listed in the pull down menu. There are two ways around that problem:
- With the text highlighted, go to the Format menu select Font and Style. Type in a number in the highlighted size box. Make the number about 36, you can always change it later if that is too large or small.
- With the text highlighted, hold down the command key and hit the right bracket key. The text gets larger one point at a time. Continue this process until the text looks large enough
Step 8 - Tab each line over one space. If any text has wrapped to the next line, tab that line over two spaces. You are making room so your border does not cover text.
Step 9 - Go to one of the character fonts and find a character to use as a bullet for each point. I used a computer disk out of the font Windings.
Step 10 - Use the tool palette to draw a thick border around your text. For a refresher on the tool palette click here.
Click on the line width button, hold the mouse button down and select the thickest block
Click on the line pattern tool, hold the mouse button down and select a pattern for your line.
Click on the fill button and select No Fill (the circle with a diagonal slash).
Click on the rectangle tool to select it. Move your cursor into the top left corner of your document, click and drag to the bottom right corner of the document. Ignore the header and footer. This may require some practice the first time you try this. If you are not happy with your results go to the Edit menu and choose Undo. While the border is selected you can select a new pattern or line thickness.
Step 11 - Draw a narrow border inside the thick border. Follow the same procedure as in step 10. Using these steps I produced the following flyer:

Step 12 - Choose what you want to do next.

Custom Search
|
Visitors since November 2000 |
Memphis, TN |