ContentsNote: Disks you purchase may need formatting, but they will not be locked. The following steps may be needed only if you are reformatting a disk someone gave you. If you are going to format new disks skip to the instructions for your computer. IBM platform | Macintosh platform .
- Making sure the disk is unlocked
- Formatting a disk on a Windows computer
- Formatting a disk on a Macintosh computer
- Using DOS formatted disks on a Macintosh
Step 1. Hold the disk so the metal slide is at the bottom of the disk.
Step 2. Turn the disk so you see the circular hole in the middle of the disk. This is the back of the disk.
Step 3. Look at the top left corner of the disk. There is a black block which can be slid up or down. If the block is in the down position you can not see through the hole in the top left corner and your disk is unlocked. Do nothing. Go to instructions for your computer. IBM platform | Macintosh platform .
Step 4 - If you can see a square hole at the top left corner of the disk your disk is locked. You will not be able to format the disk if it is locked. Slide the block down until it clicks into place in the bottom of the rectangular space at the top left side of the disk. The disk is now unlocked and can be formatted. Go to instructions for your computer. IBM platform | Macintosh platform .
IBM - Formatting a disk on a Windows computer
Step 1 - Hold the disk so that the metal slide is closest to the floppy port (A: drive). The front of the disk should be facing up. Remember, the round hole in the center is on the back of the disk.Step 2 - Slide the disk into the floppy port until you hear a click.
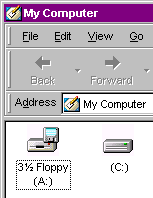
Step 3 - Place your mouse pointer on the My Computer icon on your desktop and double-click .
Step 4 - Place your mouse pointer on the 3˝ Floppy (A:) icon and click one time with the button on the right side of your mouse.
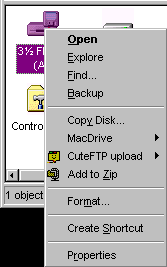
Step 5 - In the window that pops up, select Format.
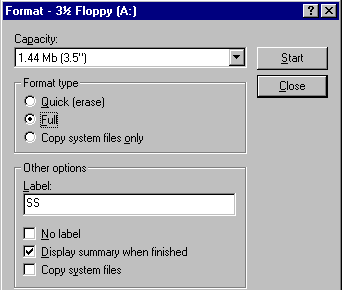
Step 6 - In the Format window that appears select Full , then click on the Start button in that window.
Step 7 - The Format Results window appears when the disk has been formatted. Click on the Close button in that window, and click on the Close button in the Format window.
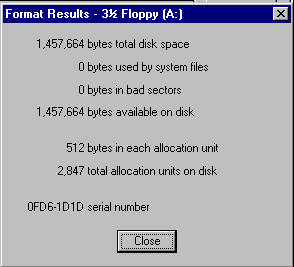
Note: If you have bad sectors on the disk, discard the disk.
Mac - Formatting a disk on a Macintosh computer
Step 1 - Hold the disk so that the metal slide is closest to the floppy port. The front of the disk should be facing up. Remember, the round hole in the center is on the back of the disk.Step 2 - Slide the disk into the floppy port until you hear a click.
Step 3 - An icon representing your disk will pop up on your desktop.

Step 4 - Click on the Special menu and select Erase Disk .
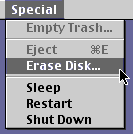
Step 5 - You have two choices to make. First enter a name for the disk and second, decide which format you want for this disk.
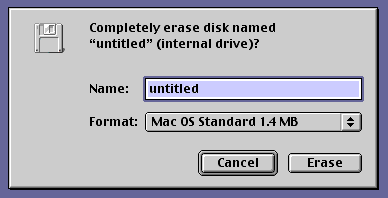
Macintosh is not your only choice. You may also choose DOS format. You will find a discussion of these choices below.
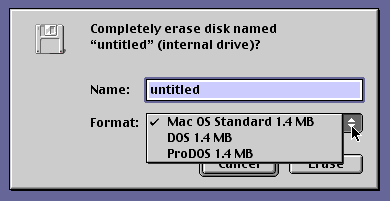
The process is automatic. When formatting is complete the disk is ready to use. Notice that the disk icon has changed because I selected DOS format

A Power Macintosh computer can read a Macintosh formatted disk or a DOS formatted disk. If you are using a windows based computer in one location and a Macintosh in another, using DOS formatting will allow you to use the same disk in either computer. Furthermore, if you have the same application on each computer you can create a document on one computer platform (Mac or IBM) and edit the document on the other computer platform (IBM or Mac).
PC Entry Level: Mouse | Windows | Desktop | Built-In | Formatting a Disk | Saving | Keyboard
Mac Entry Level: Mouse | Windows | Desktop | Built-In | Formatting a Disk | Saving | Keyboard
Search Internet4Classrooms


