Introduction to Dreamweaver
Important First Considerations:
If you are new to Dreamweaver it is important to understand the use of the term site. Dreamweaver makes reference to two sites:
- Remote Site - This is the folder or directory which contains all of your web pages and other files on the web server. It is the place to which you upload. If you school does not yet have a web page the folder or directory will be empty. However, as soon as you are given a username and password by the site webmaster, you have a remote site - your empty folder or directory.
- Local Folder - This is the folder or directory which contains all of your web pages and other files on your computer. Dreamweaver also refers to this folder as a site.
Plan your Local Site:
- Your first step in using Dreamweaver to build your site is to create a directory or folder. Plan to store all documents related to your site in the same directory; images, web pages, and any other documents that will be posted on your remote site.
- Before going any further, create a directory or folder on the computer you will be using most often to update your web site. Create a sub-directory for your images. Now you are ready to " define your site ."
Define Site
- From the Site menu select Define Sites ... then select New.
Defining your Local Site
- You enter information in three boxes.
- Site Name - I selected the same name as the directory I had established. That is not required.
- Local Root Folder - Click once on the folder icon and navigate to locate the directory you created.
- HTTP Address - This is the web address of your index page, or your home page.
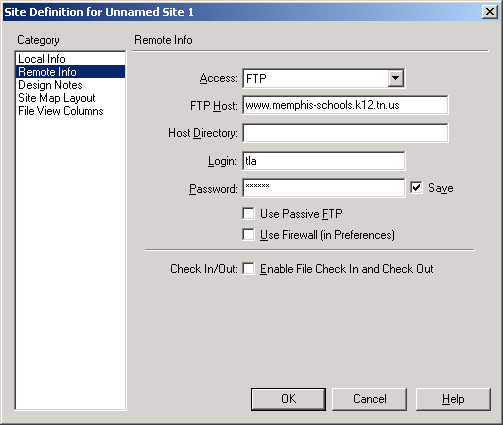
Define Remote Site
- Several choices must be made here.
- When this dialog box opens only one choice is available. Change Access from None to FTP
- Enter the name of the server to which you will be uploading.
If you are a MCS webmaster, the new domain works also. www.mcsk12.net
- If you are a Memphis City Schools webmaster, leave the host directory blank.
- For MCS webmasters, Login is your username.
- You know what to put in the password section. However, consider carefully the Save box. If you are the only person who will be using the computer, Save is a safe option.

Local Site
- Select OK, and Dreamweaver will examine the directory where your local site is located to build a list of files. The only files displayed in this window will be those on your computer. If you wish to see the files on your server select the Connects to remote host button.
Getting Connected
- When you select the remote host button, two plugs connect, the green light comes on and Dreamweaver downloads a list of all files in your remote directory. If you have a large number of files and an older computer, be patient. This may take a minute or two.
Downloading a File to Edit
- Find the file you want to edit in the Remote Site window on the left. Click on that file one time to select it and click one time on the Get Files button (the down arrow).
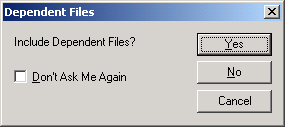
Dependent Files
- Former users of Claris Home page. will like this feature. Home page. did not give the option to bring along all images, and other files, connected to the web page, only the text. Select Yes to download text and images, select No if you only wish to download the text HTML document.
Uploading Changes
- After making changes to the file you downloaded, save the file to your local site. From the Site window select the name of the file you want to upload by clicking on it one time in the Local Folder window on the right. Select the Put File(s) button to send your changed document to the server.
Dependent Files
- If you only changed text on your document, select No in the Dependent Files dialog box. Upload will be much faster.

Go To Next Tutorial: Dreamweaver Basics

Use of this Web site constitutes acceptance of our Terms of Service and Privacy Policy.