Dreamweaver: The Basics of Web Development
Web Design Rules of Thumb for Schools, Classes, etc.
There are several important things that need to be done before you write one word on a web page.
- Familiarize yourself with any rules established for the server to which you plan to upload files.
- Decide who your audience is. If you have several pages, you may find that each page has a slightly different audience. Keep those people in mind as you write the page. The reason for a web page is to communicate information.
- Plan the general structure of your site. As you do that, remember to make your site easy to navigate. Any page on your site should have a link to allow viewers to return to your home page easily.
- Put some thought into the images you plan to use:
- Avoid posed shots. Yes, that includes administrators as well as students. The principal is the chief instructional leader. Consider using images which show your principal interacting with groups of students in their classrooms. Do you really want the headaches that come with a posed group of students?
- Feature what is important about your school. Is it the sign out front, the building itself, or could it be something else entirely different? If you want my answer send me email. In the meantime, if you absolutely must have a picture of that sign, take the picture when a group of students is involved in some group project with the sign in the background.
- Keep the image size small. Too many images, or large images will make your web site open slowly.
Using Dreamweaver to Accomplish Basic Web Page Development
Page Properties | Text Considerations | Using Tables | Using the Properties WindowPage Properties
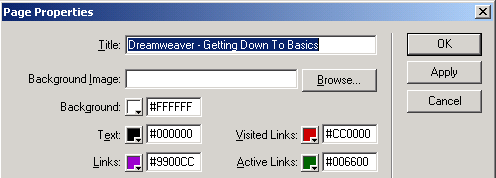
To make changes to an entire page select Page Properties from the Modify menu. There are several things you might consider.
- Title - This is not the same as file name. Make a clear statement as to the nature of the page in the title. This is displayed in the title bar of your browser. The title is also used as the name of the Favorite or Bookmark listing.
- Background image - Do not feel obligated to use a background image just because you can. Some excellent web pages have been ruined by the use of an image which makes it difficult for the viewer. For example, look at a page of classroom management tips .
- Background Color - If you select no color, the default color is white. In the image below, #FFFFFF is the hexadecimal code for white. You don't have to know the code. By clicking on the down arrow in the bottom right corner of the box, you may select any color. A light color may make the page appealing. A very bright or dark background color may make your page appalling.
- Text color - If you do not select a color, the default text color is black. Avoid using text that is the same color as a link. This causes confusion.
- Links - If you do not select a color, the default text color is blue. If you plan to use a different color for links, be consistent. If your page background color is very dark, select a link color that will be easily visible

Text Considerations
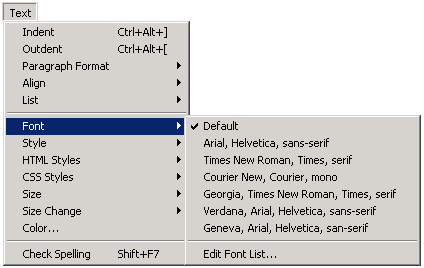
As a Claris Home page user, I always recommended that no font should be selected on a web page. My principal point was that if a web page author selects a font that is not on as viewer's computer, the default font would be used. However, I am rethinking that position because of the way that Dreamweaver is set up. Sets of fonts are provided which are found on most computers, and which look good when used together.

Using Tables
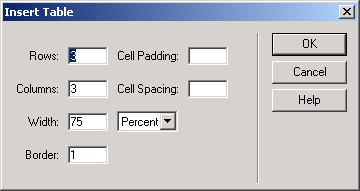
Tables provide an easy method of organizing information on a web page. To place a table on your page Table from the Insert menu.
- Cell Padding - The number of pixels of space that surrounds the content of a table cell
- Cell Spacing - The width of the lines that draw the table
- Width - The width of the cell may be specified in percent or pixels. Percent is relative to the size of the browser window being used to view your web page. On the other hand, if you specify pixels, and the number of pixels is greater than a screen width, the person viewing your page will be forced to scroll horizontally.
- Border - A border of 4 or 5 makes the border look like a picture frame. A border of 0 makes your table invisible.

You may wish to edit the table, making changes beyond what is offered in the basic Insert Table dialog box. To do so, select the table, or a cell in the table, and click on the down arrow in the bottom right corner of the Properties window. That window expands to offer you the choice of coloring the background or border of a cell, or to change the span of a cell.

Using the Properties Window
When Dreamweaver is first opened, a confusing array of windows is presented. Most of those windows are not needed as you develop your page. Go to the Window menu and deselect all of the windows except Properties. You will use the properties window extensively as you write your web page. With this window you may change font type, size and style. You may select or deselect bulleted or numbered lists. Highlighted text can be converted into a hyperlink by putting the linking information into the Link window.
Go To Previous Tutorial: Dreamweaver Introduction
Go To Next Tutorial: Dreamweaver Tables

Use of this Web site constitutes acceptance of our Terms of Service and Privacy Policy.