| Sign Up For Our Newsletter |
| Sign Up For Our Newsletter |
Learning to use Kidspiration in your classroom
This Tutorial is based on Kidspiration 2
Using the Tool Bars || Using the Menu Bar Items || Using a Template || Using Writing View || Using the Menu Bar Items
Many of these are familiar but some things in each may need explaining.
File Menu
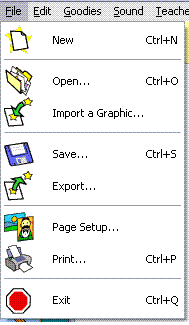
Importing a Graphic - You can import a picture using this tool. Just select the picture from a file on your computer and click ok.
Export - Once your map is created, you can export it in many formats. One format, HTML, will save it so that it can be shown as a webpage. The other formats save it in picture format.
Goodies Menu

Background Color - You can change the color of the background by clicking on the arrow on the right and selecting the color you wish
Lined Paper Colors - When you are in the Writing Mode, then you can changed the paper colors. You will not see this option available in the Picture Mode.
Sound Menu
You can add sound to your worksheet.
< Record - By selecting this tool, a recording box appears and you can record your information about symbols or graphic concepts. You will need a microphone to do this. Some machines come with microphones installed; others will need a microphone plugged into the sound part of your computer. Voice - You can change the sound of the voice that reads your work for you. There are many to select from. When you click on a new voice, it states the name of the voice so that you can hear your selection.
Teacher Menu
>The Teacher Menu can be enabled just by clicking on Teacher on the menu bar and selected Enable Teacher menu. You can put a password on this to protect it from student use.
The Activity Wizard tool lets you create an activity for your students and then save it in the format and with the picture libraries you wish your students to use. It steps you through the process of selected the shapes and font that you wish to use and then saves the activity for future use.
The Save Default settings allows you to set the default of new documents for your students. You can set the color, the font, the shape, the libraries and more.
The Picture to Topic option is for beginning writers. It translates the picture symbol labels into words in Writing View.
Locked Item - allows you to lock in place symbols so that students will not be able to move them. There is a red diagonal line in the boxes on the outside of the selected symbol
Teacher Symbol - This tool allows you to write instructions under the symbol. The symbol cannot be linked with anything. The symbol and words will not show up in Writing View. Notice the red triangles indicating a Teacher Symbol
Align - Evenly Space - These allows you to align and space groups of symbols you have selected by holding down the shift key as you select the symbols.
Install User Symbol - This tool allows you to copy a symbol from a worksheet and install or put it into a custom library of pictures.
Edit Symbol Libraries - This tool allows you to edit your Libraries of pictures and symbols and create custom libraries for specific activities. Just click and drag symbols from the left side to the right side to add symbols to your custom library.
Application Options - This allows you to set your preference options.


Internet4classrooms is a collaborative effort by
Susan Brooks and Bill Byles.

advertisement
advertisement
Use of this Web site constitutes acceptance of our Terms of Service and Privacy Policy.
