| Sign Up For Our Newsletter |
| Sign Up For Our Newsletter |
Learning to use Kidspiration in your classroom
This Tutorial is based on Kidspiration 2
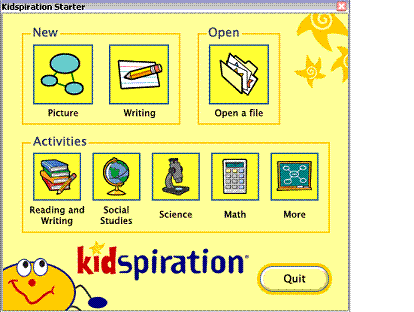
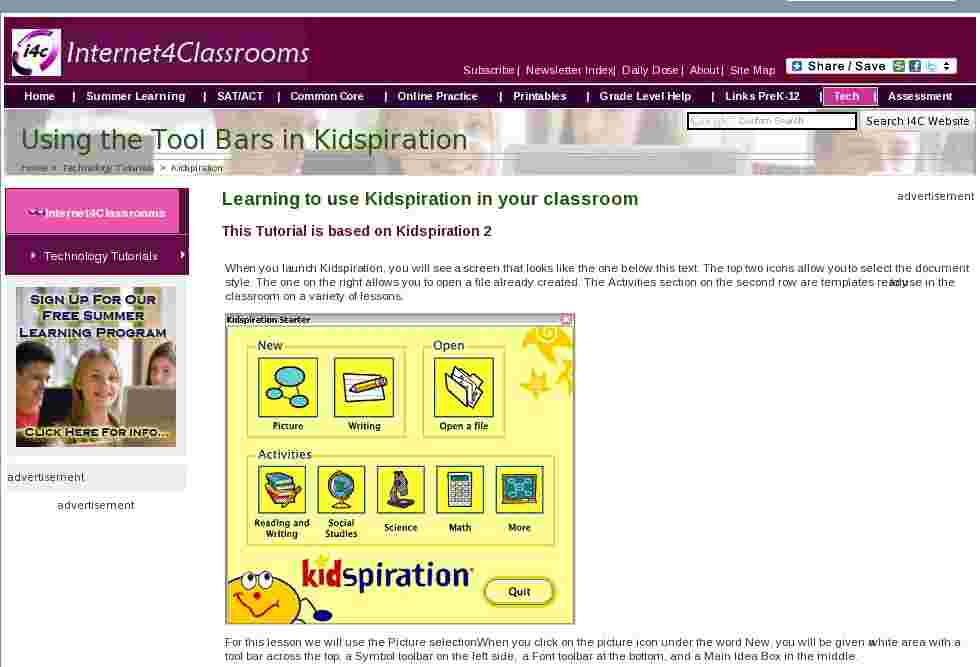
When you launch Kidspiration, you will see a screen that looks like the one below this text. The top two icons allow you to select the document style. The one on the right allows you to open a file already created. The Activities section on the second row are templates ready to use in the classroom on a variety of lessons.
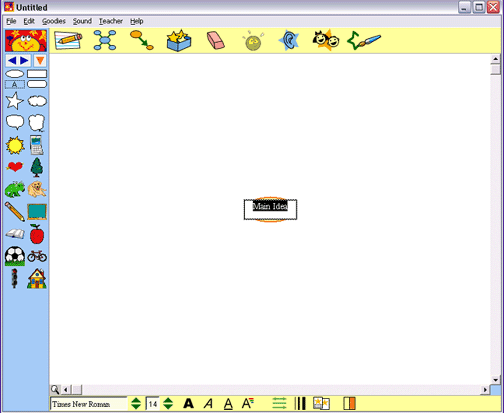
For this lesson we will use the Picture selection. When you click on the picture icon under the word New, you will be given a white area with a tool bar across the top, a Symbol toolbar on the left side, a Font toolbar at the bottom, and a Main Idea Box in the middle.
The Picture View Toolbar
The numbers under the icons correspond with the explanations below.

1. Go to Writing - used for switching between the Writing format and the Picture Format
2. Add Symbol - used to add more place holders to add topics
3. Link Symbols - a linking tool to add links between the symbols
4. Super Grouper - This tool allows you to group many symbols into one category.
5. Clear Tool - Click on the object you wish to erase and then click on the Clear Tool. It will delete the item.
6. Undo Tool - This will undo the very last thing you did.
7. Listen - This tool will read your work to you.
8. Student Name - Clicking on this will allow a student to type in his/her name on the work
9. Symbol Maker - This tool will allow you to create your own symbols.
The Formatting Toolbar
This toolbar is found at the bottom of the worksheet. The numbers under the icons correspond with the explanations below.

1. Font - allows you to change the font style of the text. When you click and hold down the mouse, a list of new fonts will display.
2. Font - Clicking on the up or down arrow allows you to change the font one at a time.
3. Text Size - When you click and hold down the mouse, you can click on a specific number for your text size.
4. Text Size - Clicking on the up or down arrow allows you to change the text size a step at a time
5 . Changes the selected font to a Bold Style
6. Changes the selected font to an Italic style
7. Changes the selected font to an Underlined style
8. Changes the color of the words in the selected font
9. Arrows - Changes the type of arrowhead on the selected link
10. Changes the line thickness on the selected symbol or link
11. Hide Captions - Toggles between allowing the words to be shown or hidden
12. Fill Color - Each section controls the fill color of the symbol selected. You can recolor the items by clicking on the box with the color you wish to change and select a new color to fill that section of the symbol.
The Symbol Palette

The Kidspiration symbol at the top will allow you to close the application quickly while giving you a choice to save your work.
The blue arrows , when clicked on, will display the next library in a list of different libraries of pictures to use in your graphic organizer. To see a preview of the picture just point to it with your mouse, do not click. When you click, the picture will be inserted into your work.
The orange arrow , when clicked on, will give you a list of library categories so it is easier to find a specific picture. There are shapes to select from; circle, rectangle, and oval. You can write inside of these. If you select a picture and your shape is selected, the shape will disappear and the picture will appear and vise versa.
Select the A on the Symbol toolbar and start typing to write text in the white area. It will look like a box is around the text, but once you deselect it, the box will disappear and all that will be left is the text itself.
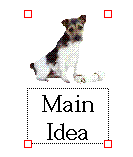
The pictures you see above are in the basic library of pictures. To put one into your work, just click on the picture. If you have a symbol selected, it will replace that symbol. For example, if the Main Idea symbol is selected, and then you click on a picture of a dog; the circle shape will disappear and the dog will be in its place. The text will not be affected. It will be displayed below the picture. An example is below.
Search Internet4Classrooms
 Custom Search
Internet4classrooms is a collaborative effort by Susan Brooks and Bill Byles.


advertisement
advertisement

- Site Map |
- About Us |
- Teacher Training |
- Make Internet4Classrooms.com your home page. |
- Copyright © 2000-2024 Internet4Classrooms, LLC All rights reserved.
Use of this Web site constitutes acceptance of our Terms of Service and Privacy Policy.
1764988072119046 US 1 desktop not tablet not iPad device-width