| Sign Up For Our Newsletter |
| Sign Up For Our Newsletter |

Using Buttons on a Slide Show
A common misconception is that user created buttons are used to navigate from one card in a HyperStudio stack to any other card, but for PowerPoint slide shows mouse clicks carry one straight through a slide show from beginning to end.The purpose of this tutorial is to destroy that misconception. We shall make buttons to navigate back and forth within a PowerPoint slide show, and make a button which will lead to a page on the Internet.
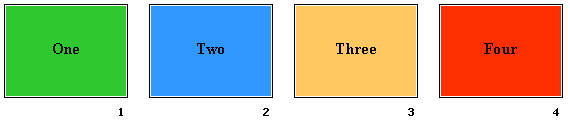
Step 1- Before any buttons are created, make a simple four-slide show.
- choose Blank presentation
- select the title only format
- color each of the four slide backgrounds a different color
- move the title bar to the middle of the slide
- place a single word on each slide corresponding to the number of the slide (one, two...)
Step 2- Save your show. Buttons rely on hyperlinks, and hyperlinks require a path. Therefore, your show must be saved so a location can be specified.
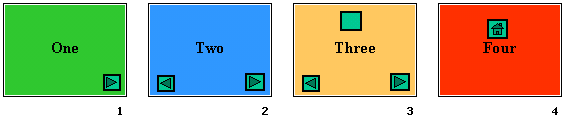
Step 3 - Select Normal view for slide one so the slide can be edited. We are going to add a button in the bottom right corner of slide one to allow us to jump to slide Two.
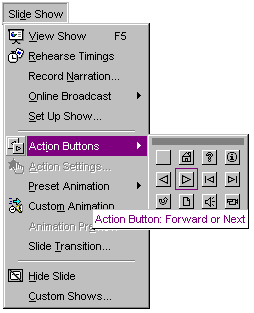
Step 4- After selecting an action button, your mouse cursor turns into a cross hair shape. Move the cursor about an inch or two from the bottom right corner of the slide. Click, keep the mouse button depressed, drag down and to the right to draw a button.
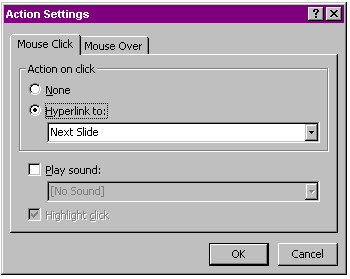
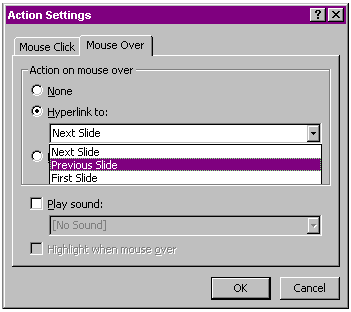
Step 5 - As soon as you finish drawing the button (by letting go of the mouse button) an Action Settings pop-up window will be displayed. If you have selected the Forward or Next button, the default setting will be to go to the next slide by mouse click. Click OK to accept this setting. From the settings window below (shortened for this image) you could select Mouse Over, or click on the down arrow in the Next Slide box and choose another action. For this show, select the default setting.
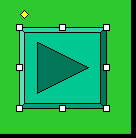
Step 6 - Select slide Two. Repeat the procedure to create a button to the next slide. Make this button act also on a mouse click, just like the first one you made. Also create a button in the bottom left corner of slide Two to go back to the first slide. Look at the image with step 3. The back button is to the left of the button outlined by the purple square. For this button, select the Mouse Over tab. Read the pop-up window carefully. Even though you have chosen the Back button, you must select Previous Slide from the pull down menu.
"What's that you say? Your buttons don't work?" Be patient, buttons only work while you are showing your slide show, not while editing.
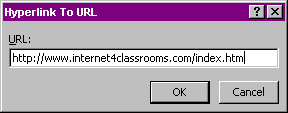
Step 7 - Select slide Three and put the same two buttons at the bottom of the slide. After you have completed those buttons, add a third button in the middle at the top of the slide. This will be a hyperlink to an Internet page. From the pull down menu in the Hyperlink to: box, select URL. A Hyperlink to URL dialog box pops up. Paste, or type a URL into the box. I have suggested one for you: http://www.internet4classrooms.com/index.htm Copy this URL to paste into the Hyperlink to URL dialog box. Click OK.
Step 8 - Select slide Four. We will add only one button to slide Four. In the middle of the slide, above the "Four," insert a button back to the first slide. Choose the button with a house on it, as a link to the Home slide. Make this a Mouse Over button, so clicking is not required. Your show should be complete.
Download the show produced from this tutorial.
If your PowerPoint is older than Office 2000, download this show .Note: After trying this show I discovered that the mouseover command happens so fast that the only way to go from slide Three to slide Two, is to move one of the buttons at the left corner. If you do not, the mouseover command is executed so rapidly that you go back from Three to Two to One without seeing slide Two.

Internet4classrooms is a collaborative effort by
Susan Brooks and Bill Byles.

advertisement
advertisement
Use of this Web site constitutes acceptance of our Terms of Service and Privacy Policy.
