| Sign Up For Our Newsletter |
| Sign Up For Our Newsletter |

Using Excel as a Graphic Organizer
Making a Ten Frame
Using Excel as a graphic organizer, you can create a variety of documents useful in a classroom. This module will discuss how to create a ten frame. The frame can be printed and used as a worksheet. However, if viewed in Excel you have some interactive possibilities. If you have classroom projection capability, or an interactive white board, this ten frame can be really useful.Open an Excel workbook. Click on the column heading A . The entire column will highlight. Scroll over to the right until you can see column heading L . Hold down the Shift key and click on the L . You should now have 12 columns selected. Click on the line between any two column heading letters and drag to the left until the column width is approximately 10.00 (75 pixels). When you release the mouse button all 12 columns will be the same width. Scroll back to column A and click anywhere to remove the highlight color.
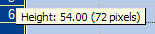
Next, click on Row heading 1, hold down the Shift key and click on Row heading 15 to highlight all fifteen rows. Click between any two row headings and drag to make a height of 54.00 (72 pixels). The worksheet should now contain large, basically-square cells.
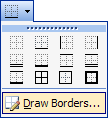
To outline the ten frame, we will draw a thick border around a set of cells that are five cells wide and two cells high (ten cells for the ten frame).. The border will be drawn around the area from cell B2 to cell F3. The Border button (located on the Formatting toolbar) has a small down pointing triangle immediately to the right. Click on the down pointing triangle and slide down to Draw Borders . Click one time.
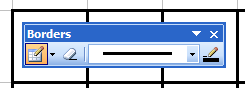
When the Borders pop-up window opens, click on the down pointing triangle and slide down to the last border which is the thickest that you can draw. Use the Draw Borders pencil to draw outline the area from cell B2 to cell F3 with thick black borders around each side of the ten cells.
We no longer need the grid lines. To get rid of them Go to the Tools menu and select Options . In the bottom left corner of the View tab you will see a check mark by the word Gridlines . Click in the box to remove the checkmark. When the Options dialog box is closed your ten frame will be the only lines on the Excel worksheet. If you see a box around a cell you did not draw in, that only means that you clicked into the cell, and the cell is now selected. .
To make this ten frame ready for students to use, we will create circular, colored markers which can be placed into the cells of the ten frame. To draw the marker you will need the Drawing toolbar. If you do not see the word Draw in the bottom left corner below your worksheets, the toolbar must be added. One way to add the tool bar is to click on the View menu, slide to Toolbars , and then slide over to Drawing . On the drawing toolbar you will see an Oval. Click on this shape. Your cursor has changed to a cross hair drawing cursor. To draw a perfect circle, hold down the Shift key and leave it held down as you drag. Drag and draw a circle that will fit inside one of the squares of the ten frame. To color the circle, use the fill color toolbar button on the Drawing toolbar. The button looks like a paint bucket spilling paint. Click on the small down pointing triangle to the right of the bucket and select a color. If the circle did not fill with color, click on the circle and repeat the process.
For the final step, you will copy the circle and paste nine more so the markers can be moved into the ten frame. With the circle selected (circles or boxes surround it), hold down the Ctrl key as you press the letter C one time. ( Ctrl + C ) That copies the marker. To paste nine more, hold down the Ctrl key and tap on the V key nine times. ( Ctrl + V ).
The ten frame is ready to use. Turn on your interactive whiteboard, call a student to the screen, and have them display a number using the ten frame.

Let us know if you have any other ideas for using this feature of Excel.


Internet4classrooms is a collaborative effort by
Susan Brooks and Bill Byles.

advertisement
advertisement
Use of this Web site constitutes acceptance of our Terms of Service and Privacy Policy.
