| Sign Up For Our Newsletter |
| Sign Up For Our Newsletter |
�

Using a Macro to perform a sequence of operations
The procedure for recording as macro is the same, regardless of how many steps are involved in the action that will be performed. For that reason, this module will demonstrate a simple macro. After data is entered into four boxes, each box will be selected and the data will be cleared from the cells. The keystrokes which are used to perform this will be recorded as a macro. Although a macro can be started by a keystroke combination, the process is made more simple if a button is associated with the macro. Therefore the first step will be the addition of a button maker on the toolbar.
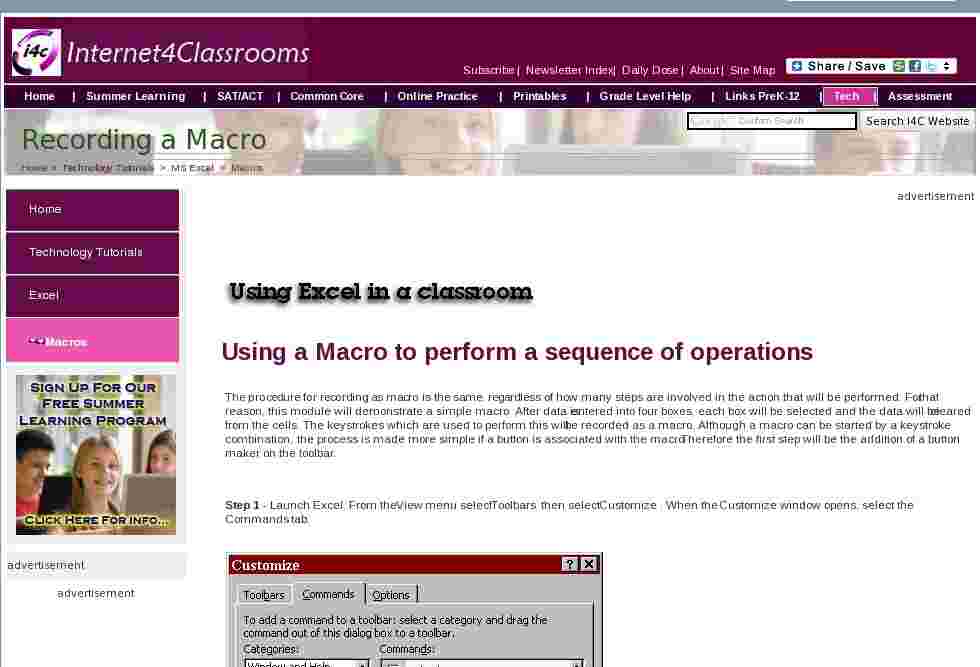
Step 1 - Launch Excel. From the View menu select Toolbars then select Customize . When the Customize window opens, select the Commands tab.
Step 2 - In the Categories section of this window, select Forms . Button will be one of the choices near the top of the Commands section of this window. Click and drag the button icon from the Customize window to any spot on the toolbar. I decided to drop the button icon just to the right of the Format Painter button.
From the Commands section of the Customize window seen above, you may use the Check Box or the Option Button as the object which is used to initiate the action recorded in your macro. That choice will be up to you.
Step 3 - You create the Excel worksheet upon which the macro will be acting. I will set up a series of four colored boxes in which data will be entered. When someone selects the button which begins the macro, all entered data will be cleared from the colored boxes. The order in which the operation will be accomplished is as follows; enter data, start recording macro, clear data from the colored cells, then finally stop recording the macro.
Create the worksheet - I typed four simple requests for information and provided four colored blocks for the data.
Step 4 -Draw and label the button which will begin the macro - After writing the worksheet, and entering data on the sheet, select the button tool that you added to the toolbar. When you move the cursor back into the worksheet it will have changed to a cross hair Decide where you want to place the button, then click and drag to draw the size of the button. You can edit this button later. As soon as you are finished drawing the button the Assign Macro windows will pop up. Name the macro (I named mine clear_it) and use the pull down menu beside Macros in: to select This Workbook .
Step 5 - Record the Macro - After you have named your macro and chosen whether you want to associate it with all workbooks or just this workbook, it is time to click on Record... to start recording the macro. You will be presented with a Record Macro window
This window will allow you to associate the macro with a shortcut keystroke combination. Several keystroke combinations of Ctrl and some other key already exist. If you choose this option, stay away from those that you know and use often. The advantage of using a button to initiate the macro is that you do not have to remember the keystroke combination.
Step 6 - You are now ready to click OK to begin recording whatever keystrokes you want your macro to remember. This should be done after you are sure exactly what you want to do. Any stray keystrokes will be recorded in your macro.
Perform the action you want the macro to perform - I selected each of the colored blocks by holding down the Ctrl key and clicking on each block one at a time. Mac users hold down the Command key while you click on the blocks one at a time. After all blocks that are to be cleared have been selected, choose Clear then Contents from the Edit menu.
Step 7 - Stop recording the macro - When the colored cells have been cleared, stop the macro. This can be accomplished in one of two ways.
1. When you start recording a control box should appear on your screen. If so, select Stop Recording .
2. If you do not see the control box, select Macro then Stop Recording
from the Tools menu.
Step 8 - Time for some housekeeping - If you followed these steps exactly, you now have a button which will clear entered data from the colored blocks. However, the button is named Button . You know what the button does, but no one else will know. Right-click on the button and choose Edit Text . Highlight the current name of the button and rename it.

If you want to change the font, size, color or style of the text, select Format Control.
Step 9 - Test your new macro - Enter data into each of the colored blocks. Click on the button you drew to start the macro. The colored blocks should be clear, ready for the next person. In my example the blocks are selected. That is because I stopped the macro as soon as the data was cleared. If I had clicked into the starting cell before stopping the macro recording the cursor would be back at the starting point for the next person.
Before After 
See a sample worksheet - A sample of the workbook used in the production of this tutorial is available. After selecting the link to download the workbook, select Save . When you open the workbook choose Enable Macros .
Download a copy of the Excel workbook named macro_simple.xls
If you automatically get the message that the macros are disabled you must change the security level in excel. From the Tools menu select Macro then Security . Change your security setting from High to Medium .
Close the worksheet named macro_simple and do not save the changes. When you open the worksheet the next time you will be given the opportunity to enable macros.
Be aware that the macro is very specific. I instructed mine to clear data from E4, E6, E8 and E10. Anything typed in any other location would not be affected by this macro. Good luck writing macros!

Internet4classrooms is a collaborative effort by
Susan Brooks and Bill Byles.

advertisement
advertisement
Use of this Web site constitutes acceptance of our Terms of Service and Privacy Policy.
