| Sign Up For Our Newsletter |
| Sign Up For Our Newsletter |

Navigating with Internet Explorer Buttons
Using the Standard Button toolbar
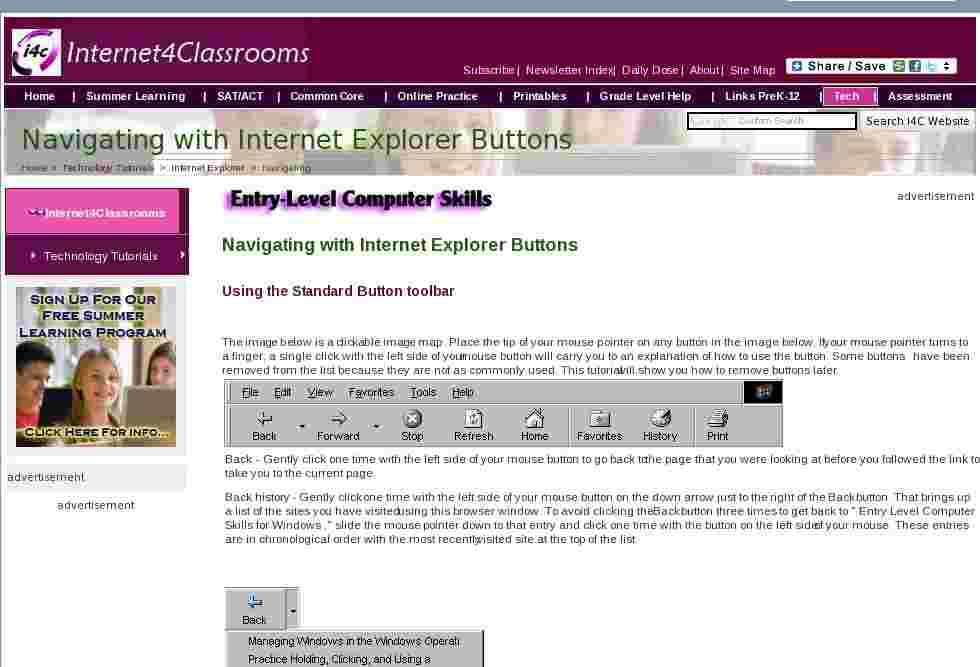
The image below is a clickable image map. Place the tip of your mouse pointer on any button in the image below. If your mouse pointer turns to a finger, a single click with the left side of your mouse button will carry you to an explanation of how to use the button. Some buttons have been removed from the list because they are not as commonly used. This tutorial will show you how to remove buttons later.
Back - Gently click one time with the left side of your mouse button to go back to the page that you were looking at before you followed the link to take you to the current page.
Back history - Gently click one time with the left side of your mouse button on the down arrow just to the right of the Back button. That brings up a list of the sites you have visited using this browser window. To avoid clicking the Back button three times to get back to " Entry Level Computer Skills for Windows ," slide the mouse pointer down to that entry and click one time with the button on the left side of your mouse. These entries are in chronological order with the most recently visited site at the top of the list.
Forward - This button will not be available unless you have used the Back button at least once. If you have used the back button, and the forward button is not grayed out, clicking one time on the Forward button will take you to the page you just left when you clicked on the Back button.Forward history - Gently click one time with the left side of your mouse button on the down arrow just to the right of the Forward button. That brings up a list of the sites you have visited and then used the Back button to return from using this browser window. To avoid clicking the Forward button three times to get back to " A tutorial on saving for new users ," slide the mouse pointer down to that entry and click one time with the button on the left side of your mouse. These entries are in chronological order with the most recently visited site at the top of the list.
Stop - Select this button to stop the current download. If you tried to follow a link and the IE logo in the top right corner of your window is still spinning, the browser is still trying to complete your request. If too many seconds pass and you do not get to the page, put the tip of your mouse pointer on the Stop button and click one time with the left side of your mouse. Try the link again. Often this allows you to see the page quicker than if you just waited for your first click on the link to finish.Refresh - Place the tip of your mouse pointer on the Refresh button and click one time with the left side of your mouse. This asks for the most recent version of the page that you are on. There are several reasons for using this button
- If you used the stop button before all of the page downloaded, use Refresh to get a complete page
- If you know the page has changed since the last time you visited it, use Refresh to see the newest version of the page.
- If you are on a page which updates frequently (like CNN), use Refresh to see the most recent information
Home - The page that is displayed when you first launch Internet Explorer is known as the Home page. No matter how many pages you have visited in your Internet session, you can instantly get back to that first page by placing the tip of your mouse pointer on the Home button and clicking one time with the left side of your mouse. "Home again, home again! Jiggedy Jig!"
Favorites - This toolbar button opens a pane of sites on the left side of your browser window. Placing the tip of your mouse pointer on a listing in the favorites sites and clicking one time with the left side of your mouse will take you to that Internet page. An entire page will be devoted to instructions regarding this feature of Internet Explorer. If you want to get rid of the pane and see Internet pages full size, click one time on the X in the top right of the Favorites pane with the left side of your mouse. That closes the Favorites pane.
History - To see where you have been on the Internet, or where a student of yours has been, place the tip of your mouse pointer on the History button and gently click one time with the left side of your mouse button. That opens a pane of sites on the left side of your browser window. Clicking one time with your left mouse button on any domain folder in the list causes the folder to display all of the sites visited at that Internet domain. Clicking one time with your left mouse button on any link within a domain folder causes IE to return to that page.
Print - Select this button to print a copy of the Internet page you are viewing.Making Changes to the toolbar
Removing items from the Toolbar
Not all of the toolbar buttons included with Internet Explorer are appropriate for the classroom. Some are not necessary and some could be distracting. You decide which buttons that would be in your classroom and remove them from the toolbar. Many of these would be great for personal productivity at home, but not for student use in the classroom. To make those changes move your mouse pointer to the View menu and click one time with the left mouse button. Slide the pointer down to Toolbars , then over and down to Customize . Click on the word Customize .
A popup dialog box named Customize Toolbar opens. To remove an element from the toolbar, click on the name of the button or item in the right side of the window. Click one time on the Remove button to take an item off the toolbar.
Items to remove from the toolbar - (Reading from left to right on the Standard Button toolbar)
- Search - The best way to search is to go directly to a search engine or directory that you are familiar with using.
- Mail - Until someone shows me a really impelling reason for student Email in the classroom, I will recommend holding off from using student Email. Even if that changes, this is a link to your Email, don't leave that there on student computers.
- Edit - There are some good templates which you can edit for use with classroom assignments. Once again, that is for your own use. If you find a good use for student edited pages, use the File menu or put the button back on the toolbar.
- Discuss - This requires a newsgroup server which is not available.
- Real.com - Unnecessary for student projects and assignments.
- Messenger - Instant messaging may be a big help to you at home, but I don't think you want the issues that come with supervising chat in your classroom.
I removed each of the six buttons above and also the vertical separators which are included in the typical IE toolbar. That left me with the following Toolbar.

Adding items to the ToolbarIf you still have the popup dialog box named Customize Toolbar open, changes can be made immediately. If not, follow the instructions above to reopen the dialog box (View/Toolbars/Customize). To add an element to the toolbar, click on the name of the button or item in the left side of the window. Click one time on the Add-> button to add an item to the toolbar. There are three excellent toolbar buttons which could be of use in classroom projects.
- Size - This button would allow quick and easy changes in text size.
- Copy - If you allow students to copy text from the Internet (not all teachers do), this button would make the process easier.
- Print Preview - Before you print, see what you (or your students) are going to print.
- In addition you may wish to add some separators for a pleasant view
My final customized Toolbar is ready for student use.

Task - Part 1: Choose two items from the list of items to be removed, and one item from the list of items to be added. Customize the toolbar on your browser. Part 2: Go back to the Customize Toolbar window and Reset the toolbar to the way it looked before you made the three changes in Part 1.
Return to the Entry Level PC index

Internet4classrooms is a collaborative effort by
Susan Brooks and Bill Byles.

advertisement
advertisement
Use of this Web site constitutes acceptance of our Terms of Service and Privacy Policy.
