| Sign Up For Our Newsletter |
| Sign Up For Our Newsletter |
advertisement
Using Excel as a Graphic Organizer:
Making a Web
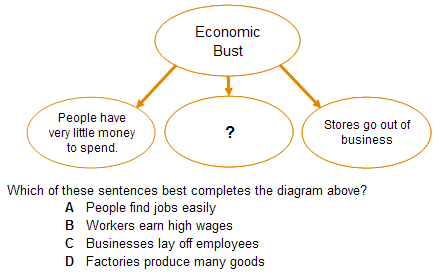
The example used below came from the 5th grade TCAP Item Sampler found at:
http://www.state.tn.us/education/assessment/tsachsamp5.pdfWebs are common features of the TCAP assessment. This activity will use Excel to create the sample web that is seen below:
Open an Excel workbook. First, let’s remove the grid lines before we draw the web. Go to the Tools menu, slide down to Options and click one time. On the View tab, in the bottom left corner there is a checkmark by the word Gridlines.
Click in the box to remove the check mark and then click OK to return to a blank worksheet.
You must have the Drawing toolbar open to draw this web. If the toolbar is open you will see the word Draw in the bottom left corner of the Excel window. If you do not see the word Draw, go to the View menu, select Toolbars and slide over to Drawing and click one time.

Next, we will draw one of the four ovals. Click on the oval shape on the Drawing toolbar and move your cursor onto the blank sheet. Notice that the mouse pointer has changed to a cross hair. That is the drawing cursor. Click on the left mouse button, leave the button pressed down, and drag diagonally to the right and down to draw a shape like you see above. After drawing the oval shape, copy the shape by holding down the Ctrl key and tapping the C key (Ctrl + C) one time. After a shape is copied, paste three more of the ovals by holding down the Ctrl key and tapping the V key (Ctrl + V) four times. Move them into an arrangement like you see above.
To add text in an oval, click on the oval and type the text you see above. Text will look small, we will fix that later. Leave one oval blank or enter a question mark as you see above. You can make changes to each oval, one at a time, or change them all at once. Click on an oval, hold down the Shift key and click on each of the other ovals. Release the shift key. All of the ovals you clicked on are selected. To change them all at once, go to the Format menu and click on AutoShape. On the Font tab select a text size of 11. Use a larger size if you drew a larger oval. On the Alignment tab select Center for both vertical and horizontal alignment. Click on OK to see the changes you made.
The next step is to connect the outer ovals to the center oval. To do that, we will use a part of the AutoShapes menu named Connectors. Click on AutoShapes, move your cursor to Connectors and select the second one, a straight line with one arrow head. Your cursor is now a cross hair. cursor used for drawing. Without clicking, move your cursor to the top oval. Notice that blue dots pop up showing where you may start drawing the connector. Click on the dot closest to another oval, let go of your mouse button (don’t click and drag) and move to a lower oval. When you see blue dots click one time on the dot closest to the title oval. Follow this procedure until all three ovals are connected to the title oval.
To make the web look as much lick the TCAP sample as possible, enter the question and four choices below the web. Put each line in a new line on the worksheet. Start every line after the question one cell further to the right than the cell where you typed the question.
To practice this skill, use the procedure you followed above to create the web displayed below:
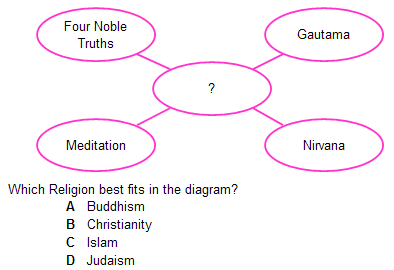
The example used above came from the 7th grade TCAP Item Sampler found at:
http://www.state.tn.us/education/assessment/tsachsamp7.pdfLet us know if you have any other ideas for using this feature of Excel.
Search Internet4Classrooms
 Custom Search
Internet4classrooms is a collaborative effort by Susan Brooks and Bill Byles.


advertisement
advertisement

- Site Map |
- About Us |
- Teacher Training |
- Make Internet4Classrooms.com your home page. |
- Copyright © 2000-2024 Internet4Classrooms, LLC All rights reserved.
Use of this Web site constitutes acceptance of our Terms of Service and Privacy Policy.
1764988073305018 US 18 desktop not tablet not iPad device-width