
 |
Links for K-12 Teachers | Assessment Assistance | On-Line Practice Modules | Daily Dose of the Web
Step 1 - Make sure the computer is set up for file sharing.
- Go to Start/Control Panel
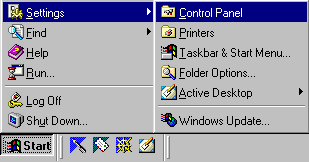
- When the Control Panel window opens, select Network

- On the Network dialog box make sure that the Configuration tab is selected and the network components window contains the following line.
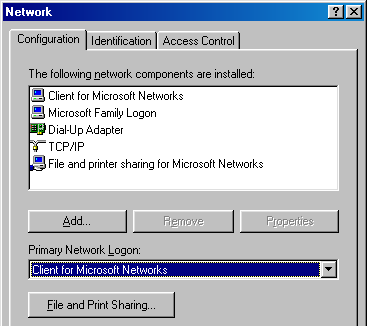
If you see the line there, click cancel and close that box and go to Step 2. If you do not see that you must add it by selecting the File and Print Sharing button below the network components window. In the window that opens you will click in each of the two boxes and then select OK. The computer must be restarted before you can continue.Step 2. Create a folder on the Desktop to hold the files you plan to share across the network.
- Move your mouse pointer to an empty area of your desktop and click with the right mouse button. From the pop-up menu which appears select New, then select Folder.
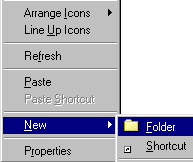
- Your new folder appears on the desktop with the name area highlighted. Name the folder anything that will remind you that it will be used for storing shared files. I named mine "Sharing."

- After you have named your folder, put your mouse pointer on the folder and click with the right side of your mouse.
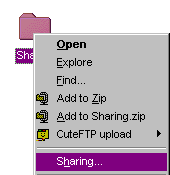
- In the dialog box that opens select Shared As and give it a name if you have not already named the folder. Select full in the Access Type section of the window since everyone is going to use it.
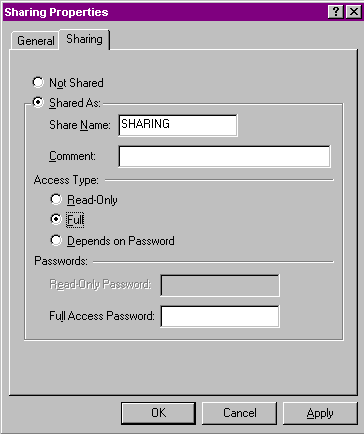
Click Apply and then OK, or just click OK and sharing will be active.
- After the dialog box above closes, there will be a hand under the folder indicating that this folder is shared across the network. Don't be impatient, it might take a second or two for the hand to show up after you close the Sharing Properties dialog box.

Return to the Network Coordinator's Workroom

Custom Search
|
Visitors since November 2000 |