| Sign Up For Our Newsletter |
| Sign Up For Our Newsletter |
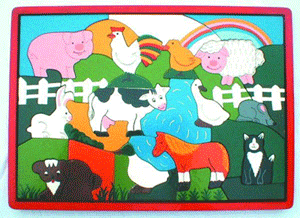
To make a show using invisible buttons, first find a good picture that has elements that you want to feature in your PowerPoint show. I selected a picture that has twelve different farm animals. Over each animal's picture I plan to place action buttons that will direct the viewer to a slide about that animal. Next I will make the buttons invisible. Ready? Let's learn how to do this.
The picture I used
Source:
%20puzzles/C3J%20Wooden%20Farm%20animals%20in%20tray%20Puzzle%20lrg.jpg" TARGET="_blank"> http://www.woodentoys-uk.co.uk/images/C%20jigsaws%20&%20puzzles/C3J%20Wooden%20Farm%20animals%20in%20tray%20Puzzle%20lrg.jpgLaunch PowerPoint and start with a blank slide. Insert the picture you plan to use and resize it so the picture covers most, or all, of the slide. At this time, you should have in mind how many other slides you want these invisible buttons to point to. Using the New Slide button, add enough slides for the show. In the picture above there are twelve animals, so I added twelve slides.
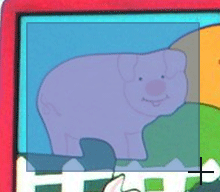
One at a time, put something in the title area of each slide to identify the content of the slide. For the picture above I used animal names. You will need these titles to link your action buttons to the slides. When you have finished, go back to slide one and identify where you want the first invisible button to be located. I will start with the animal in the top left corner, the pig.
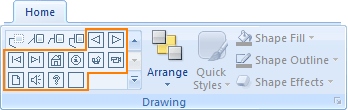
Drawing Action Buttons - Action buttons (or other objects) can be added from three areas of the PowerPoint ribbon.
(1) Home Tab - Near the right edge of the Home tab you will find the Drawing area. On the left side of the Drawing area you will find a large list of ready made shapes. Use the scroll arrow to move to the bottom of the list of objects where you will find the Action Buttons (outlines in orange in the image below).
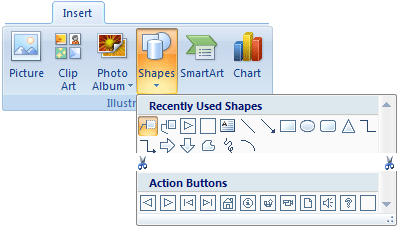
(2) Insert Tab - In the Illustrations area of the Insert tab you will find a button named Shapes . Click on the button to see a large list of shapes (truncated in the image below). The bottom row of shapes is where you will find the Action Buttons .
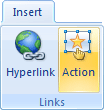
(3) Insert Tab - A shape, image, or selected text can be associated with an action. After you have used one of the pre-drawn Action Buttons from one of the two areas above, experiment by associating an action with some other object on a slide. Note: Unless an object is selected, the Action tab, located in the Links area, will be grayed out.
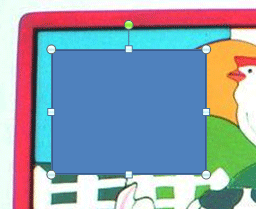
Step 4 - Select the button which is blank; the last one on the row of action buttons. After selecting the button, your mouse cursor turns into a cross hair shape. Move the cursor about the top left part of the animal picture. Click, keep the mouse button depressed, and then drag down and to the right to drag the shape over the entire animal, or as much as possible. Clicking on a button does not create a button, it allows you to click and drag to draw a button. Move your cursor onto the slide. Your pointer has turned into a cross hair shape that you see on the the bottom right of the blue box below.
Picture a box covering the object you want to cover with an invisible button. Put your cursor at the top left point of the box, click your left mouse button and leave it depressed while you drag the shape of your button down to the bottom right point of the box. Do not let go of your mouse button until you have completely covered the part of the picture you started with. First time action button users tend to click and let go, drawing a tiny button which is not much larger than a period. If you do this, you will see four circles surrounding your new button. The easiest thing at this point is to delete the new button (or choose Undo from the Edit menu) and try again.
The button you have drawn will cover the object, but it will not be invisible.
As soon as you let go of your mouse button an Action Settings window pops up. None is the default selection for a blank button. You must click in the white circle to the left of Hyperlink to: then click in the block where you see Next Slide . Scroll down to Slide ...
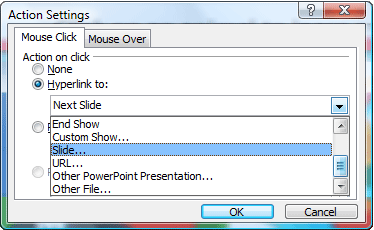
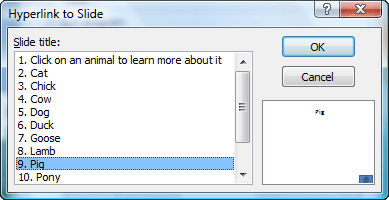
When you click on Slide ... a window pops up to allow you to select the slide that you want to hyperlink to. That is the reason that we added animal names in the title area of the slides. Warning! The animal will be covered and you may not see any part of the animal. You must remember what animal you selected to cover.
The button has been drawn, the hyperlink has been established, but you can not see what is under the button. If you knew that the picture of a pig was under the blue box during the show you could click on the button and go to a slide about a pig.
If you make the button invisible it will still cover the pig, and will still have a hyperlink associated with it, but the button will not cover up the image below. Making the button invisible must be done differently that this process was done in previous versions of MS Office.
Right-click the button image and slide down to the last choice in the list, Format Shape .
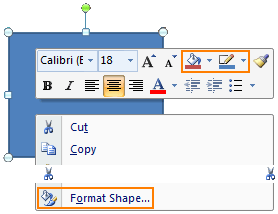
In the Fill area of the Format Shape window Solid Fill is selected and Transparency is set at 0%. That must be changed to 100%. If you make that change, the color is still there, but it is completely transparent. In older versions of Office the choice was to select No Fill. However, in Office 2007 removing the color gives nothing to click on and the hyperlink will not work.
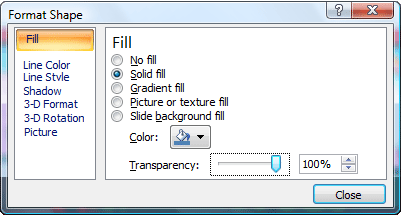
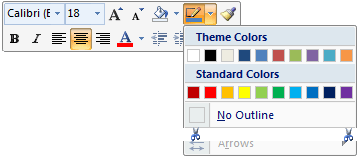
The button will be almost invisible at this point. You must also remove the line that surround the button. That can be done from the Format Shape window (above) by clicking on Line Color and selecting No Line . The process can also be accomplished by right-clicking the button, selecting the Border button (below) and then selecting No Outline .
Continue this process until buttons have been drawn, and turned invisible, for each of the parts of the image that you will be using to link to parts of the slide show.
On each of the slides other than the picture slide, you should place a button to allow someone to return to the picture. If your picture is on slide one, the button with a picture of a house is set to return viewers to the first slide. Draw one. Move it to the place on the slide where you want it to be on all others. Select the button. Copy the button. Move to a slide that does not have the Home button and Paste . The button is placed exactly where the other Home button was placed.
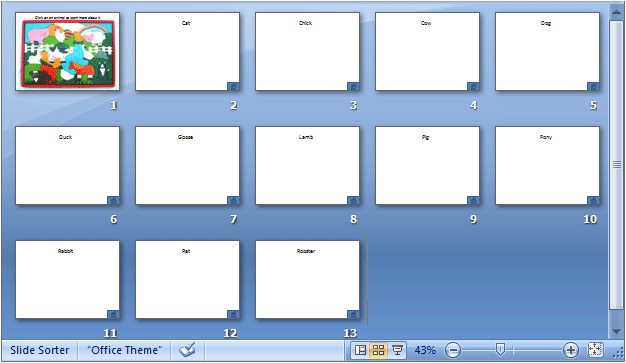
A problem that may happen is that someone clicks where there is not a picture, sending the show to the next slide instead of where you wish it to go. Dan Doyle suggested a way to prevent that. Click on the Slide Sorter layout, (the four squares at the left corner of the PPT window) right click on any slide and select Slide Transition. When the dialog box opens, go down near the bottom to the Advance Slide section and click on the check mark in the box beside the On Mouse Click selection. Then,at the bottom, click on the Apply to all slides button. This will eliminate the accidental clicks that send the show onto the next slide. (Thanks for that tip, Dan!)
Pictures related to a variety of subjects could be used to make an invisible action button PowerPoint show are available from Internet4Classrooms . Have fun making your show!
See the farm animal slide show using invisible buttons
See a periodic table (Chemistry) using over one hundred invisible buttons on one slide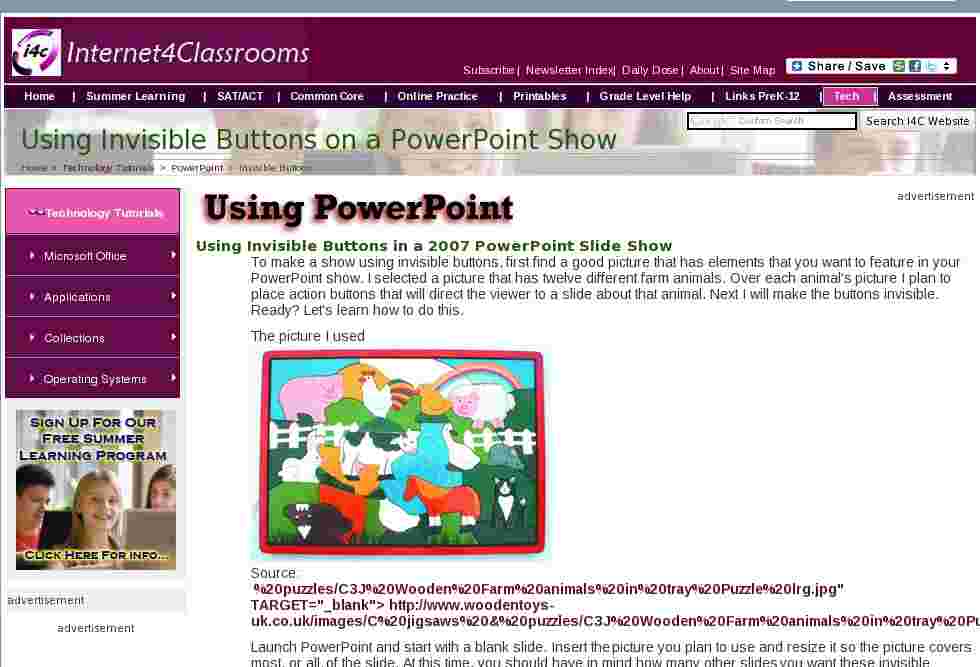

Internet4classrooms is a collaborative effort by
Susan Brooks and Bill Byles.

advertisement
advertisement
Use of this Web site constitutes acceptance of our Terms of Service and Privacy Policy.

