| Sign Up For Our Newsletter |
| Sign Up For Our Newsletter |

Sending a Word Outline to PowerPoint with Office 2007
" I can NOT afford to allocate twelve days of my classroom time to another project using PowerPoint! "
If you have said (or thought) that, I would like to present a simple way of putting together the content of a PowerPoint show. Notice the emphasis. Too often a PowerPoint show is all about glitzy graphics and fancy animation. The following procedure puts the emphasis squarely on content.Send to PowerPoint is an option that must be added to the Quick Assess Toolbar before starting the steps below.
Step 1 - Open Word.
Adding to the Quick Access Toolbar - Just to the right of the circular Office button you will find the small Quick Access Toolbar which provides a quick way to save, undo, or open a new document. If other commands would be useful to you Office lets you customize this small toolbar.
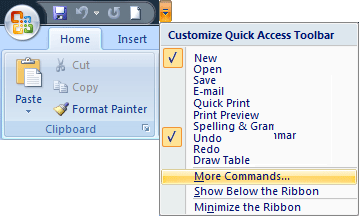
Click on the small down arrow to the right of the small toolbar to customize the quick access toolbar. Slide down to More Commands... and click one time.
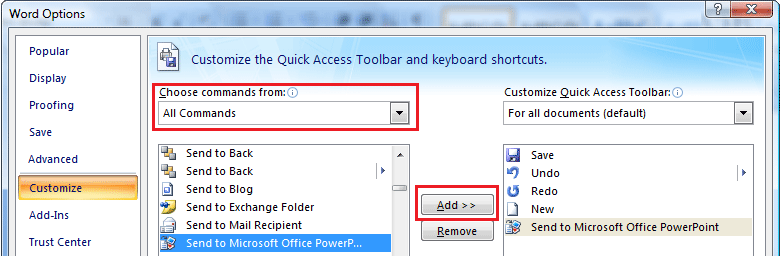
When the Word Options window opens, use the down arrow at the right of Popular Commands in the Choose commands from: window and change to All Commands . Sscroll down to Send to Microsoft Office PowerPoint . Click on the command and then click on the Add button to move that command into the list of commands on the Quick Access Toolbar. That command will stay on the toolbar until you remove it. You are ready to prepare the document to sent to PowerPoint.
Step 2 - Begin typing at the top line of the Word document. Do not skip a line. Do not do anything to change the format of what you type.Step 3 - Think in outline terms. Type a major idea on one line. Press Return/Enter to move to the next line and type a sub point.
Step 4 - Do not skip lines, even between major points. Do not try to tab, do not use Roman Numerals, or any other outlining procedure. Simply type points followed by sub points, which would then be followed by another major point. Download a sample document to see an example.
Step 5 - Identify the major points of your outline. Each of these will be the title of a new PowerPoint slide. Put your cursor at the beginning of the first major point. (Actually your cursor can be anywhere in that line)
Step 6 - In the Styles section of the Home tab, change the style of that line from Normal to Heading 1 by clicking on the Heading 1 button. Caution: If you are not accustomed to Office 2007's Live Preview feature you may think the formatting has been changed when you move your cursor to the Heading 1 button. The format is not changed until you click on the Heading 1 button.

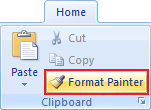
Step 7 - Repeat this procedure for each of the major headings. In the sample document from Step 4, my major points are red . If you are familiar with using the Format Painter, that would simplify your task.
Step 8 - The remaining points in your outline are sub points. Using the same procedure from step 6, change the style of each of the sub points to Heading 2. Download a sample document to see what the finished document would look like.
Final Step - From the Quick Access Toolbar select the Send To Microsoft PowerPoint icon that we added before starting the Word document. Your outline is turned into a PowerPoint show with content only. Download a sample show to see what the presentation would look like.
Two additional documents to use with this module in the form of a list of TCAP Suggestions:


Internet4classrooms is a collaborative effort by
Susan Brooks and Bill Byles.

advertisement
advertisement
Use of this Web site constitutes acceptance of our Terms of Service and Privacy Policy.
