| Sign Up For Our Newsletter |
| Sign Up For Our Newsletter |

Using Excel as a Graphic Organizer
Making a Hundreds Chart
You can make your own Hundreds Chart by typing only four numbers in an Excel worksheet.
Open an Excel workbook. Click on the column heading A . The entire column will highlight. Look to the right and find column heading P . Hold down your shift key and click on the P . You should now have 16 columns selected. Click on the line between any two column heading letters and drag to the left until the column width is approximately 5.00 (40 pixels). When you release the mouse button all 16 columns will be the same width.
Next, click on row heading 1 . The entire row will highlight. Hold down your Shift key and click on the row heading 16. Click on the line between any two row heading numbers and drag down until the row height is approximately 30.00 (40 pixels). This makes each cell approximately square.
Next we will outline the area of our hundreds chart. Click in cell C2 and drag down to cell L11 . You could also watch the changing information in the Name Box until you see
(Excel counts for you). With those 100 cells highlighted, click on the down pointing triangle to the right of the Borders button.
From the drop down menu select the second button on the last row, the one that looks like a window with 4 panes.
The grid lines have served their purpose; let�s get rid of them now. Go to the Tools menu, slide down to Options and click one time. On the View tab, in the bottom left corner there is a checkmark by the word Gridlines.
Click in the box to remove the check mark and then click OK to return to a worksheet with one hundred boxes.
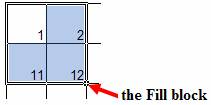
Click into the top left box ( C2 ) and type the number 1 . Use the right arrow key on your keyboard to move to the right, into cell D2, and type the number 2 . Next, click into cell C3, just below the number 1 you typed, and type the number 11 . Move to the right one cell and type the number 12 . Excel will be used to put the other 96 numbers into your hundreds chart.
Click on the number 1 that you typed. Let up on the mouse button and hold down the Shift key. With the Shift key still pressed down, click on the number 12 you typed. All four numbers will be selected. Look at the bottom right corner of the selected area. There is a black square (with a white plus on it) which is known as the Fill block .
Move the cursor over the Fill block . The cursor turns into a black plus sign . While the cursor is a black plus sign, click on the Fill block and drag over to the right edge of your hundreds chart. When you let up on the mouse button you will see the numbers 1 through 20 filling the top two rows. With those cells still selected, click on the Fill block and drag down to the bottom of your hundreds chart. Now all one hundred blocks are filled with numbers, but you only typed four of them!
With all one hundred cells still selected, click on the Format menu and select Cells . Click on the Alignment tab and select Center for both horizontal and vertical alignment. Click on the Font tab and select 14 for the font size. Click OK to return to a hundreds chart ready for classroom instruction. Use the fill color button to fill a number block with color as a starting point for instruction. There is a small down pointing triangle to the right of the fill color button. Click on that triangle to select a color.

Let us know if you have any other ideas for using this feature of Excel.

Internet4classrooms is a collaborative effort by
Susan Brooks and Bill Byles.

advertisement
advertisement
Use of this Web site constitutes acceptance of our Terms of Service and Privacy Policy.
