| Sign Up For Our Newsletter |
| Sign Up For Our Newsletter |
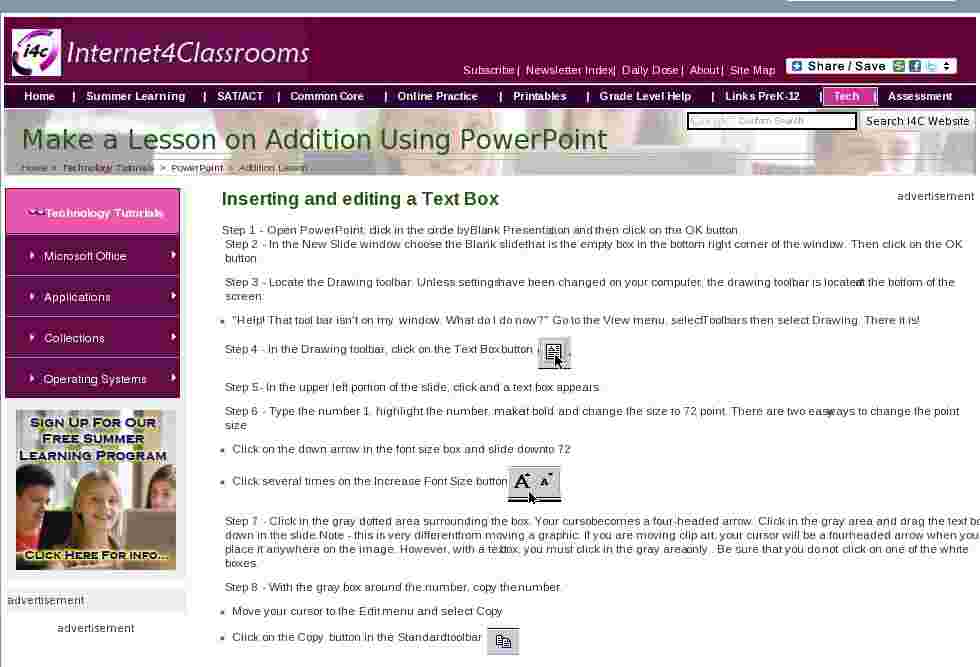
Inserting and editing a Text Box
Step 1 - Open PowerPoint, click in the circle by Blank Presentation and then click on the OK button.Step 2 - In the New Slide window choose the Blank slide, that is the empty box in the bottom right corner of the window. Then click on the OK button.
Step 3 - Locate the Drawing toolbar. Unless settings have been changed on your computer, the drawing toolbar is located at the bottom of the screen:
- "Help! That tool bar isn't on my window. What do I do now?" Go to the View menu, select Toolbars then select Drawing. There it is!
Step 4 - In the Drawing toolbar, click on the Text Box button

Step 5- In the upper left portion of the slide, click and a text box appears.
Step 6 - Type the number 1, highlight the number, make it bold and change the size to 72 point. There are two easy ways to change the point size
- Click on the down arrow in the font size box and slide down to 72
- Click several times on the Increase Font Size button.

Step 7 - Click in the gray dotted area surrounding the box. Your cursor becomes a four-headed arrow. Click in the gray area and drag the text box down in the slide. Note - this is very different from moving a graphic. If you are moving clip art, your cursor will be a four headed arrow when you place it anywhere on the image. However, with a text box, you must click in the gray area only . Be sure that you do not click on one of the white boxes.
Step 8 - With the gray box around the number, copy the number.
- Move your cursor to the Edit menu and select Copy
- Click on the Copy button in the Standard toolbar

- Use the keyboard combination to copy (Ctrl+C for IBM or Command+C for Macintosh)
Step 9 - Paste four additional copies of the number. Why four? If you copy and paste, each of the text boxes will already be formatted and you will not need to change the size, or to make the text bold. You only highlight the number 1 and change it.
- Move your cursor to the Edit menu and select Paste
- Click on the Paste button in the Standard toolbar

- Use the keyboard combination to copy (Ctrl+V for IBM or Command+V for Macintosh)
After pasting you will see five overlapping numbers. Only the last one will be highlighted.
Step 10 - One at a time, click on the numbers and drag them into place across the top of the slide in the same place as the 1 + 2 = 3 on the slide.
Step 11 - Click on the number, highlight and change them one at a time until the top of the slide says 1 + 2 = 3.
Drawing a rectangle and changing the Fill Color
The Rectangle tool will be used to draw three colored boxes.
Step 1 - In the Drawing Toolbar, click on the Rectangle tool.
Step 2 - Next you will click and drag to draw three rectangles. If you have not done this before you should put your cursor near the top left corner of where you want the rectangle to be and hold your mouse button down as you drag the cursor to the bottom right corner of where the rectangle should be. When you let go of the mouse the fill color will be placed in the box.
Step 3 - Repeat this process for the two other boxes you see in the slide above. Remember to leave room for the plus (+) and equal (=) signs. You should then have three boxes, and they will all be the same color. Note: you must click on the Rectangle tool each time you want to draw another box.
Step 4 - Click on the center box to highlight it.
Step 5 - In the Drawing Toolbar click on the down arrow beside the Fill Color paint bucket and choose a new color for the box

Step 6 - Repeat that Procedure for the box on the right. If you do not like any of the automatic fill colors suggested, select More Fill Colors .
Inserting and resizing Clip Art
PowerPoint Clip-Art images will be used to represent numbered objects in three boxes. I selected birds and used a different bird for each of the first two counting numbers. This lesson will illustrate inserting clip art into the left and center box.
Step 1 - Insert a clip art image into the left box. There are two ways to do this on a blank slide.
- Go to the Insert Menu and select Picture, then slide over to Clip Art
- Click on the Insert Clip Art button in the Standard toolbar.

Step 2 - When the Microsoft Clip Gallery dialog box opens click on the Clip Art tab if it is not already selected.
Select the category you want to use (mine was Animals). When you find an image you want to use, either double-click the image or click on the Insert button in the top right corner of the gallery window.
Step 3 - Repeat this procedure and insert two images into the middle box. Your slide should look like slide 2 of the slide show you can download.
Step 4 - The images you insert may not be inside the colored boxes. To move an image, place your cursor anywhere on the image except one of the eight white boxes around the image. When your cursor turns into a four-headed arrow, click and drag to move the image.
Step 5- The image you insert may be too large to fit in the colored box. This is especially true if you want to place six images into the box, as we will do later. To resize an image place your cursor exactly on one of the four white boxes at one of the corners of the image. Your cursor will turn into a two headed diagonal arrow. When you see this, click and drag toward the center of an image to make it smaller, or away from the center of the image to make it larger. Note - With earlier versions of PowerPoint, you must hold the shift key down as you drag in order to keep the proportions of the picture.
Copying and pasting Clip Art images
The three images have been pasted into the left and center box. There is no need to repeat the step of going to the clip art database. Copying and pasting the existing images will be faster and easier.
Step 1 - Select one of the images by clicking on it. You know the image is selected by the eight white boxes around it.
Step 2 - Copy the image
- Move your cursor to the Edit menu and select Copy
- Click on the Copy button in the Standard toolbar
- Use the keyboard combination to copy (Ctrl+C for IBM or Command+C for Macintosh)
Step 3 - Paste the image. Do not worry about trying to click where you want the image to go, it will paste near the image copied.
- Move your cursor to the Edit menu and select Paste
- Click on the Paste button in the Standard toolbar
- Use the keyboard combination to copy (Ctrl+V for IBM or Command+V for Macintosh)
Step 4 - Move your cursor onto the image, click and drag to the colored box on the right side of the slide.
Step 5- Repeat steps 2, 3, and 4 with the other two images.
Step 6 - Copy the plus (+) and equal (=) signs and paste them between the colored blocks.
�
Copying and pasting slides in the Slide Sorter view
To this point you have produced only one slide. This represents only one addition fact. However, we can very quickly expand this slide show to include five slides teaching several addition facts. Working in the Slide Sorter view you are going to copy and paste this slide four times.
Step 1 - Select Slide Sorter View. There are five small buttons below the bottom left corner of the slide. The middle button looks like it has four small squares in it. That is the slide sorter view, and shows a thumbnail image of the slide
Consider for a minute what the final slide show will look like. I want to review the following addition facts
- 1 + 1 = 2
- 1 + 2 = 3
- 2 + 2 = 4
- 2 + 3 = 5
- 3 + 3 = 6
That means I need to have one slide before the current slide, and three more slides after the current slide. We are going to accomplish this by copying the slide above and pasting the exact same slide four times. Then each slide will be modified until the show includes all of the addition facts listed above.
Step 2 - Click on the slide and copy the slide
- Move your cursor to the Edit menu and select Copy
- Click on the Copy button in the Standard toolbar
- Use the keyboard combination to copy (Ctrl+C for IBM or Command+C for Macintosh)
Step 3 - Paste the slide four times.
- Move your cursor to the Edit menu and select Paste
- Click on the Paste button in the Standard toolbar
- Use the keyboard combination to copy (Ctrl+V for IBM or Command+V for Macintosh)
Step 4 - Double-click the slide 1 thumbnail image and make two changes. The slide should read "1 + 1 = 2", and you should remove one bird from the center and right blocks.
Step 5 - Continue this process until you have changes slides 3, 4, and 5 also. For those slides you will need to insert more images to fit the number facts listed on the slide.
Grouping screen elements
The next step will be to bring elements onto the screen one at a time. This is known as animating the slide. In the slides created there are too many elements. There are:
- Seven text boxes
- Three colored rectangles
- Six images of birds
Animating sixteen elements would be distracting and might even prevent first grade students from seeing the pattern being presented. To overcome that objection we will group several objects so that they come on the screen at the same time. At the completion of this process there will be only five elements in the slide
- element 1 - the number 1 and the box with one bird
- element 2 - the two plus (+) symbols
- element 3 - the number 2 and the box with two birds
- element 4 - the two equal (=) signs
- element 5 - the number 3 and the box with three birds.
Step 1 - Select the number 1, the green box and the hummingbird. You select multiple items by holding down the shift key and clicking on the items one at a time. You may also do this with a drag select. Click and drag until you cover the three elements, and only those elements.
Step 2 - Go to the Drawing toolbar at the bottom of the screen, click on the word Draw and slide up to Group.
Step 3 - Click to select Group. This forces PowerPoint to deal with all three elements (the number 1, the green box, and the hummingbird) as if they were a single element.
Step 4 - Repeat this process until the elements listed above Step 1 are grouped. At that point you should have five elements on your slide.
Animating screen elements
Now it is time to animate the slide, to bring elements onto the screen one at a time. In the slides of this show there are five elements. In the last lesson you grouped the original sixteen elements into the five. Each slice will be brought onto the screen one at a time. This lesson shows how to animate the same slide that has been used as an example throughout this series. The exact same procedure will be used on the other five slides in your presentation.
Step 1 - Select a slide and go to the full slide view. If you are in the slide sorter view, double-click the slide.
Step 2 - From the Slide Show menu, select Custom Animation
Step 3 - When you select Custom Animation, the Custom Animation window opens:
Step 4 - One at a time, click on the group name to select it, click in the circle by Animate, and then leave the dot in the circle by mouse click. When you select a group, that group will be highlighted in the preview window. Continue until all 5 groups are selected.
Contrary to my expectation, group 2 was not the two plus symbols, it was the yellow block. You want the elements to animate with the leftmost element first progressing to the rightmost element last. If you have them animating in the wrong order that can be corrected at any time.
Step 5 - Be sure that all five groups have been moved from the Slide Objects Without Animation box up into the Animation Order box. Notice the up and down arrows to the right of the Animation Order window. If an element is not in the right order, use the arrows to move the group up or down in the order. When the order is correct click on Effects .
Step 6 - One at a time, click on each group and select an effect, and a sound to go with the effect if you wish to. Notice there are up and down arrows on the effect and the sound strip. That means you can find a menu of choices by clicking on those strips. Choose the preview button at any time to see how the effect would work. Use a variety of effects instead of the same effect on each slide. In planning your effects remember the Run Over Rule. ( Run Over Rule - Avoid choosing an effect that will bring a group onto the slide by passing over a group that is already on the slide.)
Step 7 - Continue this process until all five groups on this slide are animated.
Step 8 - One at a time, animate the other four slides in this presentation.
Step 9 - Save your slide show.
Ready? Take your slide show into the classroom and teach with it.
What's next? Find another skill you want to teach and build a show.
Want to try spelling?Variations on the slide show
The way the slide show is organized, the sum is presented last, and the slides progress from a sum of 2 to a sum of 6.
There are two natural ways to change this slide show;
- Go to the Slide Sorter view and drag the slides to random positions in the slide show. If there is no natural progression you will be more sure that the students understand the addition facts rather than projecting a sequence.
- Show the sum and leave one of the other numbers for last.
- Rather than 1 + 2 = and pausing for an answer, present 1 + ? = 3 and have students predict the number to replace?
- This would be done by changing the animation order.

Internet4classrooms is a collaborative effort by
Susan Brooks and Bill Byles.

advertisement
advertisement
Use of this Web site constitutes acceptance of our Terms of Service and Privacy Policy.

