| Sign Up For Our Newsletter |
| Sign Up For Our Newsletter |

Using Mail Merge
Preparing a form letter with Word and Excel
Two Microsoft Office applications will be required for this task. Excel will be used for the data and Word will be used to create the form letter. A form letter is one in which the body of the letter stays the same but specific information is inserted for/about several different individuals. You have probably gotten one like that in the past. The first step will be to prepare the data source from which information will be inserted into the form letter.
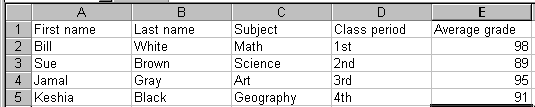
Step 1. Open Microsoft Excel. Remember to leave your browser window open until this lesson is finished. The excel worksheet will take the place of a database. A database has field names for each type of information entered. Common field names are First Name, Last Name, Telephone, and zip code. The field names you choose will be determined by the form letter you want to produce. For this activity we will use the following field names:
- First name
- Last name
- Subject
- Class period
- Average grade
Step 2. Field names must be entered in the cells across row 1. Type "First name" in cell A1. Press the Tab key to move to cell B1 and type "Last name." Continue until each of the field names above have been entered. Do not worry if the cell is not wide enough. Your worksheet will probably look somewhat like the one you see below:

Step 3. Place your cursor over the " A " in the column heading and drag to the right unto you reach the " E " column heading. All five columns will be highlighted.
Step 4. Place the cursor on the light gray line between any two of the highlighted headings, and double-click. All columns will adjust in width to fit the data.
Step 5. Enter four lines of data. Create your own or copy what you see below:
Step 6. Save the worksheet. Remember where you saved it. I recommend saving to the desktop. Close the worksheet.
Step 7. Open Word. If a new blank document does not automatically open, go to the File menu and select New . Then open a new blank document
Step 8. It is not necessary to begin typing the form letter. You may start the mail merge process before typing anything.
Step 9. Go to the Tools menu and select Mail Merge . The Mail Merge Helper dialog box opens. As you make selections in this box other selections will become available.
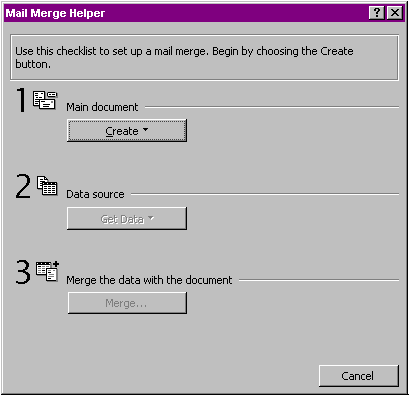
Step 10. Click on the Create button and choose Form Letter from the drop down dialog box. That brings up the following dialog box. Select Active Window.

Step 11. The Mail Merge Helper box appears with choice 2 available now that you have made a selection. Select Get Data .
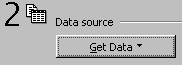
Step 12. You have already created the data source, so choose Open Data Source from the drop down dialog box. Step 13. An Open Data Source dialog box will open and you must do two things.
- Navigate to the place where you saved the Excel worksheet. You will not see your saved worksheet yet.
- Change the Files of type: box by clicking on the down arrow and scrolling down to MS Excel Worksheets

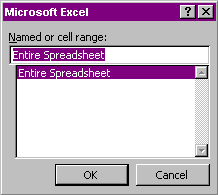
Step 14. Open the worksheet that contains the data needed for this form letter. After selecting the worksheet Word asks you to make a selection. The only choice here is Entire Spreadsheet . Select OK . Making that selection will open the worksheet
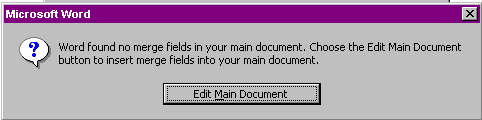
Step 15. The worksheet opens in the background, and Word asks you to make one more selection. Recall that we started with a blank document. Of course there are no merge fields there. It is time to produce the letter. In other words, you will Edit Main Document.
Step 16. Making that selection brings you back to a blank Word document. Notice that a new toolbar, Mail Merge, has been placed with the toolbars above your document. Many buttons are gray because no field has been inserted into the letter yet.

Step 17. Type the following letter. In the first line, I did not type
. I put a space at the end of the word of and selected Insert Merge Field from the Mail Merge toolbar. Do the same in each place where you see text surrounded by the less than and greater than signs. The words will not show up in Word as purple, I did that for emphasis.
- To the parents of
,
- As we approach the end of the first six weeks I wanted to let you know how glad I am to have
period
class. At this time
. If I can be of assistance please call me.
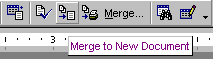
- Step 18. To see what mail merge does, select the Merge to New Document button on the toolbar.
Go back to Using Microsoft Word to Produce Classroom Documents
- Step 19. Since we entered four names in the worksheet, four letters will be produced. At the bottom right corner of the Word window you will find up and down arrows that allow you to move to from one letter to another. Possible uses - Any letter or document that needs to be sent to multiple recipients is a good candidate for a mail merge. Some obvious uses include:
- Note to parents
- Progress report
- Certificates

Internet4classrooms is a collaborative effort by
Susan Brooks and Bill Byles.

advertisement
advertisement
Use of this Web site constitutes acceptance of our Terms of Service and Privacy Policy.
